Using HTML everywhere with Wisej: Controls
With Wisej, you can use HTML for many controls. For example, when utilizing a Label control, you can assign a string to the Text property which contains some HTML, like: “<b>some text</b>”.
In this blog post, I want to show you how to make use of plain HTML elements for the following controls:
- Label
- CheckBox
- ComboBox
- ListBox
- ListView
- DataGridView
and how to handle a click event on these HTML elements at server-side – except for the ComboBox control. Currently we are using the MouseClick event to get the role attribute from the HTML elements of the control, which was clicked on the client. In the case of the ComboBox, the MouseClick event will be created when we open the DropDown and not when selecting an item. But after setting the DropDownStyle to DropDownList, the selected item also shows the HTML image.
Let’s start!
- Create a new Wisej application and add the controls mentioned above in the pixel perfect designer.
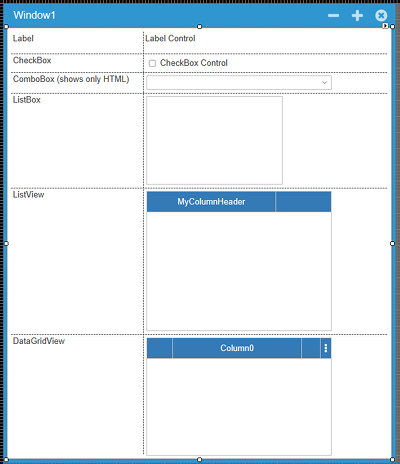
- Set the property AllowHTML for Label, CheckBox, ComboBox and ListBox to 'true'.
- Add one column to the ListView and to the DataGridView control with the help of the designer.
- Set the AllowHTML property for the created DataGridViewColumn to 'true'.
- Now we need to subscribe to the following events:
1. MouseClick for the Label, Checkbox and ListBox controls
2. ItemClick for the ListView control
3. CellClick for the DataGridView control - For a simple maintenance, I use some instance variables which hold my HTML-contents
string iconClick1 =
 " <img role=\"IconClick\" src=\"Images/icon-exit.svg\" alt=\"icon-exit\" class=\"cell-image\"> ";

string iconClick2 =
 " <img role=\"IconClick\" src=\"Images/icon-error.svg\" alt=\"icon-error\" class=\"cell-image\"> ";

string iconClick3 =
 " <img role=\"IconClick\" src=\"Images/icon-help.svg\" alt=\"icon-help\" class=\"cell-image\"> ";

string buttonClick =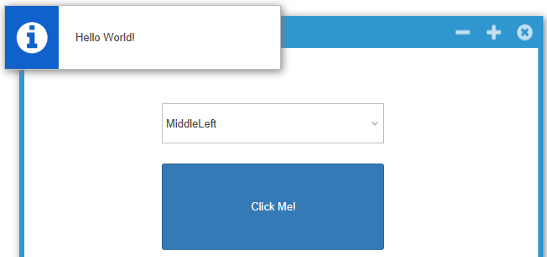
" <button role =\"buttonClick\" class=\"btn btn-success\" type=\"button\">Click Me!</button> "; - As you can see in the code, I define a role attribute besides the standard HTML. This attribute we can evaluate on the server and do whatever we want to do with it. I want to show some content in an AlertBox, but this will come later.
- I use an initialization method which will be called up in the constructor of my Window1. I called it InitControls. Now we go through the initialization of each control. Commented code shows you the correct property settings for each control, which we previously set in the designer.
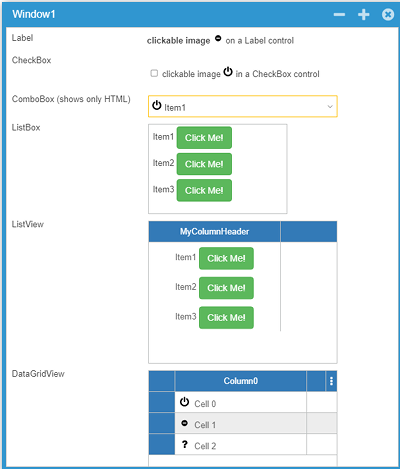
8.1. The code for Label and CheckBox looks like this:
#region CheckBox and Label
//this.label1.AllowHtml = true;
//this.label1.MouseClick += new Wisej.Web.MouseEventHandler(this.label1_MouseClick);
this.label1.Text = "<b>clickable image</b> " + iconClick2 + " on a Label control";
//this.checkBox1.AllowHtml = true;
//this.checkBox1.MouseClick += newWisej.Web.MouseEventHandler(this.checkBox1_MouseClick);
this.checkBox1.Text = "clickable image " + iconClick1 + " in a CheckBox control";
#endregion8.2. The ComboBox initialization comes next:
#region ComboBox
//this.comboBox1.DropDownStyle = ComboBoxStyle.DropDownList;
//this.comboBox1.AllowHtml = true;

this.comboBox1.Items.AddRange(new object[] {
iconClick1 + " Item1",
iconClick2 + " Item2",
iconClick3 + " Item3"});
this.comboBox1.SelectedIndex = 0;
#endregion
8.3. ListBox initialization:
#region ListBox
//this.listBox1.AllowHtml = true;
//this.listBox1.MouseClick += new
Wisej.Web.MouseEventHandler(this.listBox1_MouseClick);

this.listBox1.Items.AddRange(new object[] {
"Item1 " + buttonClick,
"Item2 " + buttonClick,
"Item3 " + buttonClick});
#endregion
8.4. ListView initialization:
#regionListView
//this.listView1.Columns.AddRange(new Wisej.Web.ColumnHeader[] {this.columnHeader1});
//this.listView1.View = Wisej.Web.View.Details;
//this.listView1.ItemClick += new
Wisej.Web.ItemClickEventHandler(this.listView1_ItemClick);
ListViewItem listViewItem1 = new ListViewItem("Item1 " + buttonClick);
ListViewItem listViewItem2 = new ListViewItem("Item2 " + buttonClick);
ListViewItem listViewItem3 = new ListViewItem("Item3 " + buttonClick);
listViewItem1.RowHeight = 45;
listViewItem2.RowHeight = 45;
listViewItem3.RowHeight = 45;
listViewItem1.AllowHtml = true;
listViewItem2.AllowHtml = true;
listViewItem3.AllowHtml = true;
this.listView1.Items.AddRange(new ListViewItem[] {
listViewItem1,
listViewItem2,
listViewItem3});
#endregion8.5. And at last, the DataGridView initialization:
#regionDataGridView
//this.Column0.AllowHtml = true;
//this.dataGridView1.CellClick += new
Wisej.Web.DataGridViewCellEventHandler(this.dataGridView1_CellClick);
string temp = iconClick1;
for (int i = 0; i < 3; i++)
{switch (i){
case 1:
temp = iconClick2;
break;
case 2:
temp = iconClick3;
break;
default:
break;
}
this.dataGridView1.Rows.Add(temp + " Cell " + i.ToString());
}
#endregion - To minimize code, I use a method called ShowAlertBox which I’ll call up in each handler we defined:
private void ShowAlertBox(string role, string text1)
{
   switch (role)
   {
      case "IconClick":
        AlertBox.Show("IconClick " + text1);
        break;

      case "buttonClick":
        AlertBox.Show("ButtonClick " + text1);
        break;

      default:
        break;
   }
} - By way of example, here is the call-up for the Label control:
private void label1_MouseClick(object sender, MouseEventArgs e)
{
   ShowAlertBox(e.Role, "on Label");
} - As you already may have noticed, I also set the class attribute in the HTML code. Right – you can also style your HTML within a Wisej control. You can find the CSS rules in the Default.html file.
- Now we’re done and we can start our Wisej Web Application. You are now able to click on the HTML images and the HTML buttons and the server shows an AlertBox.
Have fun with this great feature in Wisej!
Jens
Download: Example code for Visual Studio 2017 (Zip file)